Laravel is an open-source web framework of PHP language. It was developed by Taylor Otwell for the development of web apps by using the model–view–controller (MVC) architectural pattern and it was based on Symfony.
In Laravel, we have a built-in Mail facade that allows us to send emails using an external mail server such as Gmail SMTP server.
If you’re planning on using Laravel to send emails through Gmail in your current or upcoming Laravel project, then I’ve got you covered. In this article, I’ll guide you through the process step-by-step, so you can easily get it done.
Step 1: Configure your Gmail (if already done, Please proceed to Step 2)
To allow your Gmail to give its access to third-party applications, first, we need to enable the 2-Step Verification on our Google account.
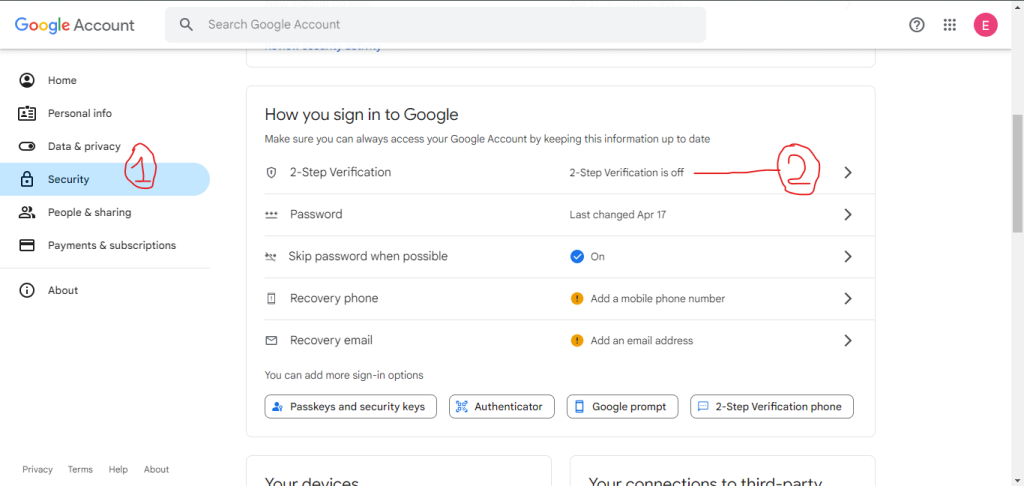
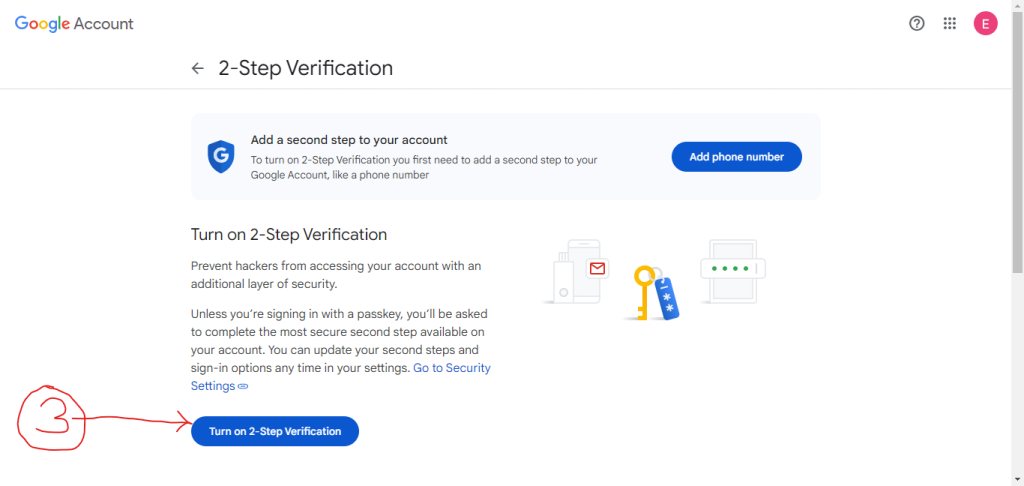
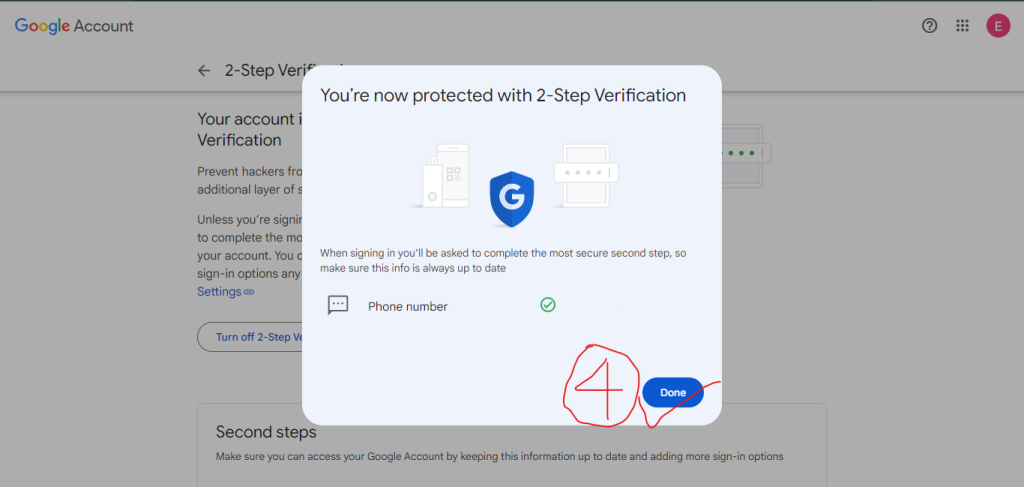
Your 2-Step Verification is now enabled.
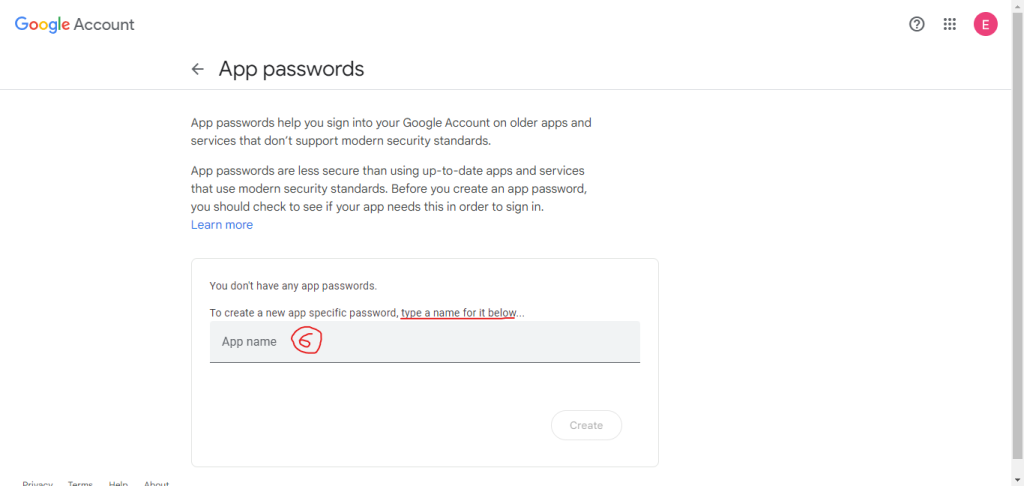
Now search for App passwords.
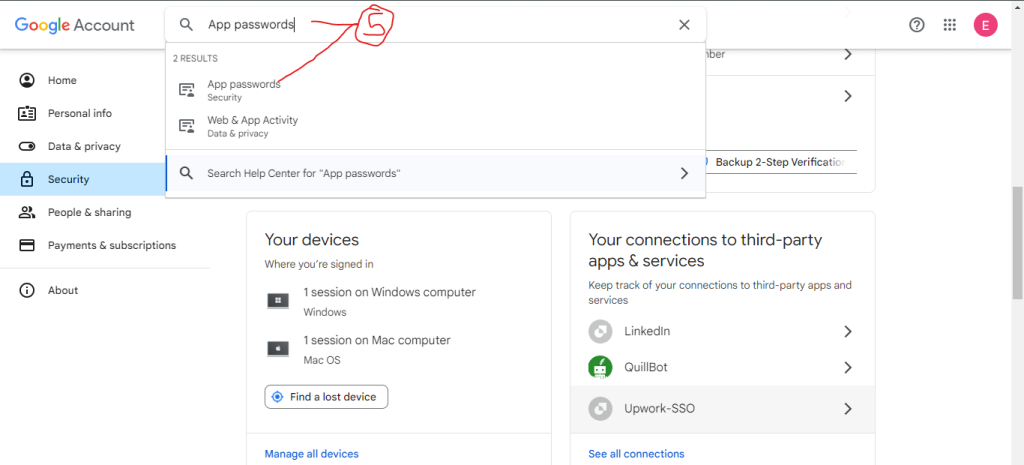
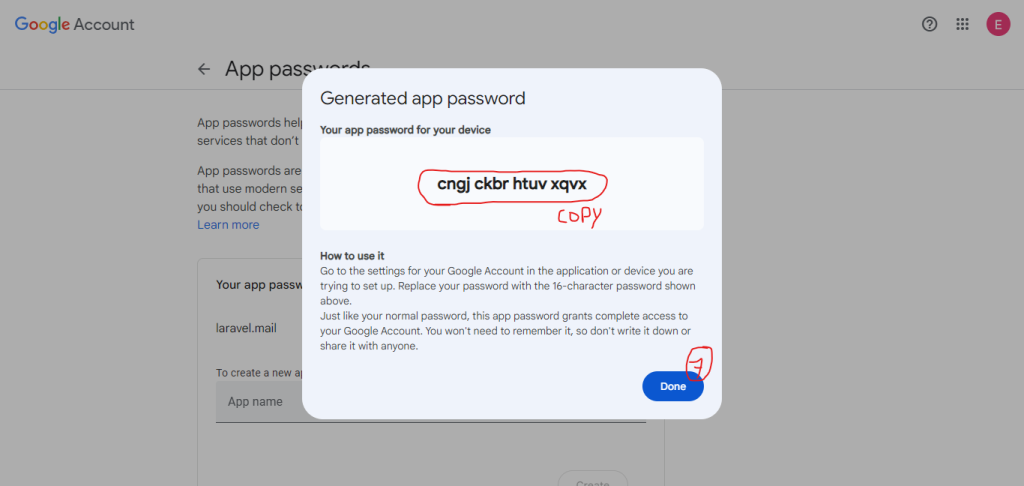
Create an App Password and copy it to use later.
 Congratulations you’ve completed Step 1.
Step 2: Installing Laravel (if already done, Please proceed to Step 3)
As we are going to create our first Laravel Project please make sure that we already installed the PHP and Composer. And if you are using macOS or Windows, you can use Laravel Herd to install PHP and Composer. It is recommended to install Node and NPM.
Now, to create a new Laravel Project, run the below command in Composer.
composer create-project laravel/laravel DemoEmail
Step 3: Mail settings configuration
Launch the .env file from your Laravel project directory (root) and open the mail configuration.
MAIL_MAILER=smtp
MAIL_HOST=smtp.gmail.com
MAIL_PORT=465
[email protected]
MAIL_PASSWORD=your_app_password
MAIL_ENCRYPTION=tls
[email protected]
MAIL_FROM_NAME="laravel.mail EmailDemo"
Now replace “ [email protected] ” with your Gmail address & “ your_app_password ” will be replaced by the Password we generated in Step 1: 7th Part.
In my case, the code will be:
MAIL_MAILER=smtp
MAIL_HOST=smtp.gmail.com
MAIL_PORT=465
[email protected]
MAIL_PASSWORD=cngj ckbr htuv xqvx
MAIL_ENCRYPTION=tls
[email protected]
MAIL_FROM_NAME="laravel.mail EmailDemo"
Step 4: Mail Class in Laravel
We can create a class for our email automatically just by running the Laravel Artisan command:
php artisan make:mail WelcomeMail
After this, a file named WelcomeMail.php will be generated in the app/Mail directory.
You can customize the __construct to support passing in a $title and a $body. Additionally, I would recommend customizing the envelope() and content() methods to define the email’s content and subject.
You can also copy this code from below.
and paste into app/Mail/WelcomeMail.php
<?php

namespace App\Mail;

use Illuminate\Bus\Queueable;
use Illuminate\Mail\Mailable;
use Illuminate\Mail\Mailables\Content;
use Illuminate\Mail\Mailables\Envelope;
use Illuminate\Queue\SerializesModels;

class WelcomeMail extends Mailable
{
    use Queueable, SerializesModels;

    /**
     * Create a new message instance.
     */
    public function __construct(private string $title, private string  $body)
    {
    }

    /**
     * Get the message envelope.
     */
    public function envelope(): Envelope
    {
        return new Envelope(
            subject: 'Welcome to laracoding.com EmailDemo',
        );
    }

    /**
     * Get the message content definition.
     */
    public function content(): Content
    {
        return new Content(
            view: 'emails.welcome',
            with: [
                'title' => $this->title,
                'body' => $this->body,
            ],
        );
    }

    /**
     * Get the attachments for the message.
     *
     * @return array<int, \Illuminate\Mail\Mailables\Attachment>
     */
    public function attachments(): array
    {
        return [];
    }
}
Step 5: Now create a controller
To handle the sending of the welcome email we are going to use this artisan command to generate a controller:
php artisan make:controller EmailController
This will generate a file named EmailController.php in app/Http/Controllers directory, add this code to the file:
app/Http/Controllers/EmailController.php
<?php

namespace App\Http\Controllers;

use App\Mail\WelcomeMail;
use Illuminate\Support\Facades\Mail;

class EmailController extends Controller
{
    public function sendWelcomeEmail()
    {
        $title = 'This is the title of your email';
        $body = 'This is the body of your mail';

        Mail::to('[email protected]')->send(new WelcomeMail($title, $body));

        return "Email sent";
    }
}
Now replace “[email protected]” with the email address on which you want to receive this test email.
Step 6: Route creating
Open routes/web.php file and add a route to map the sendWelcomeEmail method:
use App\Http\Controllers\EmailController;

Route::get('/send-welcome-email', [EmailController::class, 'sendWelcomeEmail']);
This method handles the logic for sending a welcome email to a user.
Step 7: Email template creation
In this step, we will be using the Blade (Laravel template engine) to create an email template.
Navigate to the resources/views/emails directory and create a new file named “welcome.blade.php”. Inside this file, you’ll write HTML markup to structure the email content. Additionally, you can use Blade syntax to dynamically insert data into the email template. For example:
resources/views/emails/welcome.blade.php
<!DOCTYPE html>
<html>
<head>
    <title>Welcome Email</title>
</head>
<body>
    <h1>Welcome to Our Website!</h1>

    <p>Hello, {{ $user->name }}!</p>

    <p>We're thrilled to have you join our community. Thank you for signing up!</p>

    <p>Best regards,<br>
    The Team</p>
</body>
</html>
Step 8: Send test email using SMTP
Now, we are all set to send the welcome email. Let’s start the Laravel application by this command:
php artisan serve
Open this URL in the web browser:
http://localhost:8000/send-welcome-email
The sendWelcomeEmail will be responsible for sending the welcome email to recipients with the predefined title and body. Now check the recipient’s email inbox for the results.
Conclusion:
Sending emails with Gmail and Laravel is a breeze, all thanks to Laravel’s handy Mail facade!
With just a few simple steps, you’ll have your Gmail account configured, a mail class set up, a beautiful template created, and emails flying out in no time.
Just follow along with the tutorial, and you’ll see how straightforward it is. Once you’ve got everything set up, sending emails will be as easy as pie. So go ahead, give it a try in your own application, and enjoy the smooth sailing of coding!
